Thursday, December 24, 2015

a {mini} Christmas tour.


I can't believe Christmas is already here! every year I feel like it comes and goes so quickly. it makes me sad, too, because Christmastime is one of my favorite times and my favorite holiday, by far. with it comes the best traditions, best sights, best smells... it really is the most wonderful time of the year. so it's pretty much a given that it's my favorite season to decorate for. 

I love having a live tree inside the house--that's one of my favorite smells. and I love having greenery pretty much everywhere. I have greenery [mostly faux] displayed in my decor throughout the year, but I love having real, smelly greenery in the house during Christmas. this year when we went to get our tree, I asked the Christmas tree lady if I could keep the branches they cut off the bottom of the tree. she smiled real big and said, "honey, you can take all the branches you want" and pointed me to a massive pile of branches that had accumulated from all the trees being trimmed. I felt like I was in heaven. "grab a handful! as many as you can!" I shouted to my husband. he's such a trooper and took about three or four loads to his truck. now they fill pitchers, teapots, milk jugs, you name it all throughout our home. I'll be sad to see them go.

the good, prompt, professional bloggers share their Christmas home tours well before Christmas, perhaps so that you'll be able to glean some inspiration and recreate some of their ideas. but I am none of these things, so here are my ideas and inspiration,  just in time for Christmas. I hope you enjoy!

in the past year, I've discovered my love for silver, especially old, tarnished silver. my favorite pieces of silver I've collected so far are teapots, mint julep cups, and platters. I just love its classic, understated yet elegant look.


in my {mini} fall tour, I shared about how we use our piano as a mock mantle. so this is where most of our Christmas decor is placed. there are little touches of it all throughout the house, but this is the main event.


the thing you have to know about me is I'm the world's cheapest. I think I get this from my parents. this works well for me for a few reasons: 
  1. I don't have a huge budget, plus I don't want to spend much money
  2. I love the thrill of the hunt
most of the pieces I use to decorate come from secondhand stores, garage sales, dollar stores, or the trash. on the other hand, there are places that don't fall into the previous category but don't break the bank either and I have been known to get myself into spending trouble there. my favorites are TJ Maxx, HomeGoods, and Stein Mart.


see that cute, little enamel bucket full of berries? I found it one day while antiquing with friends. it was like seven bucks. I was SO excited about it. I didn't know what I was going to do with it at the time, but I knew I needed it and it would come in handy one day. a few weeks later, my uncle was in town visiting and had stopped by my house to drop off some furniture. "do you know what that is?" he asked. "umm... no. but it's cute, huh?" I replied. he smiled and then proceeded to inform me that it was a chamber pot. of course when he told me this, I had it sitting on my kitchen table. we laughed and laughed. I still think it's the cutest little chamber pot I've ever seen.


since we don't have a chimney to carefully hang our stockings by, we hang them on the potting bench that is our entertainment center. it's no fireplace, but it works.


in our kitchen, I set up a little hot chocolate bar that hasn't gotten much use except from myself.


and now for the biggest Christmas decoration of them all: the tree. this is our second year to put our tree in an oversized galvanized tub and I'm not tired of it yet. this is our third year to have lights only on our tree, as we own about seven ornaments. I keep meaning to start collecting those, but here we are. maybe I'll get around to it this year and by next, we'll have enough to decorate it! we'll see... because honestly, I love the simplicity of a tree and just lights.


I set my table, too, but it got about as much attention as the hot chocolate bar.


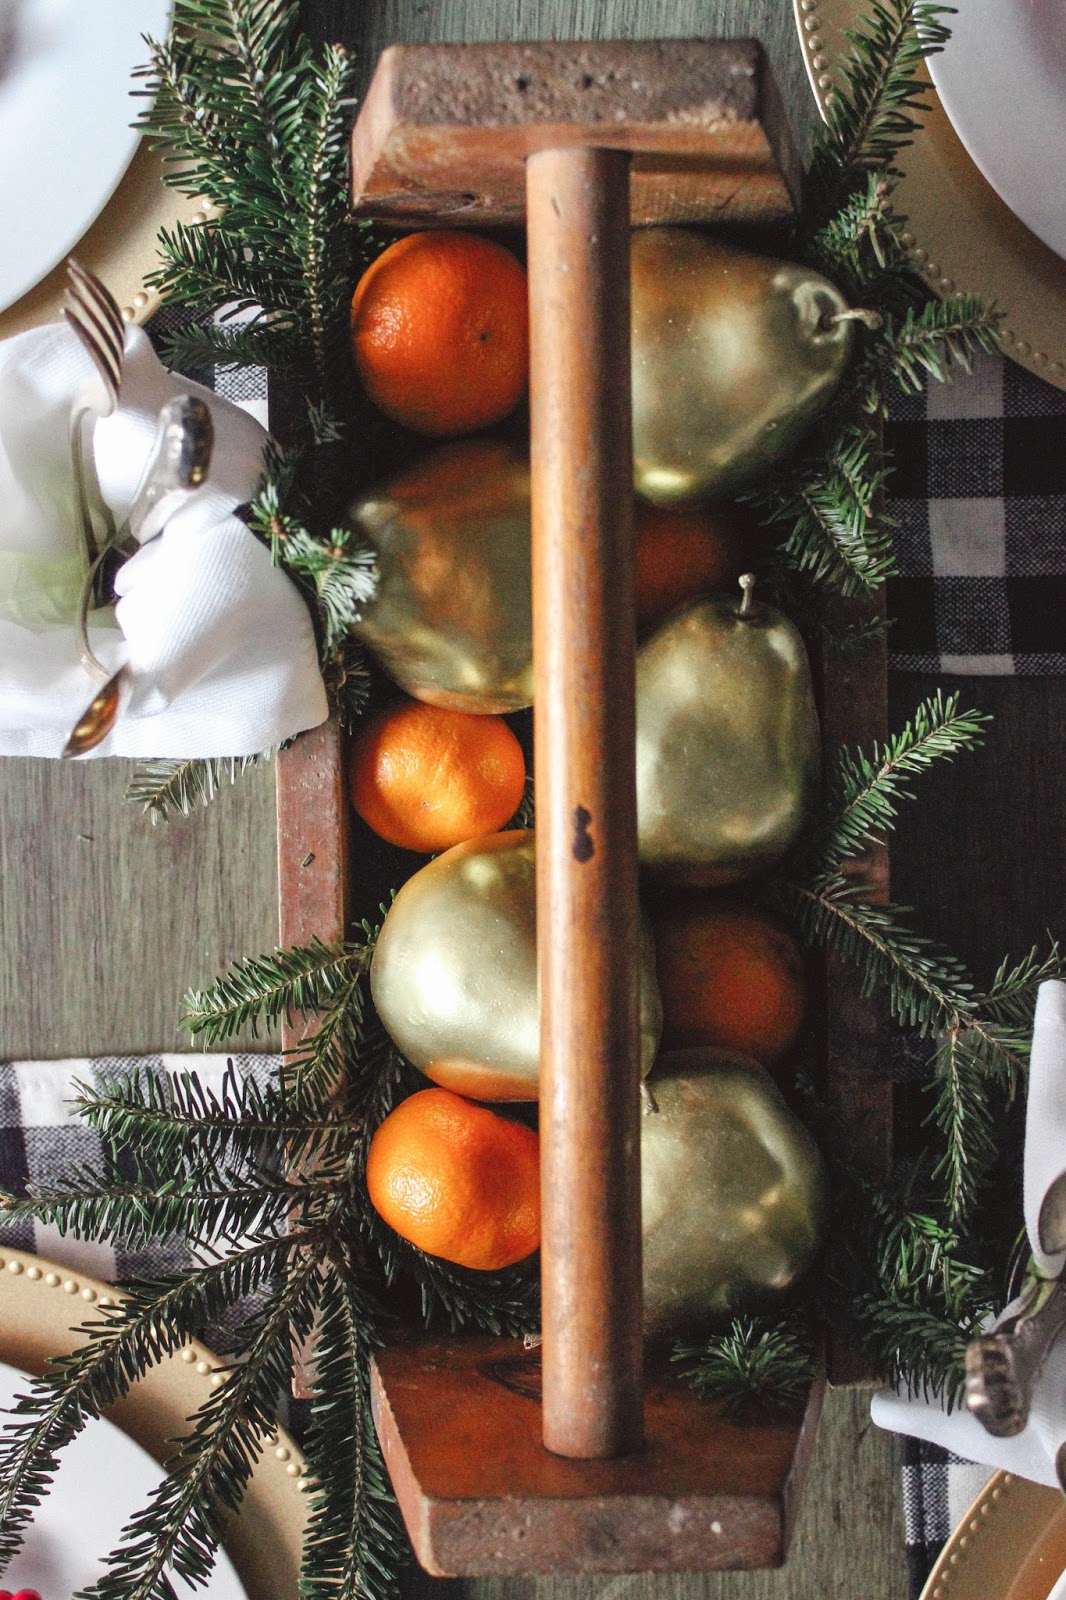
when I began to photograph my tablescape, I realized the majority of the items on my table came from the Dollar Tree. the gold chargers, the white dinner plates, the miniature holly wreaths, and the gold pears in the centerpiece were all purchased there. the placemats I found in the dollar section at Target--jackpot, I know. the green glasses, a garage sale. the antique toolbox, my husband's grandfather. and the cuties, Walmart's produce section.


I found this precious red + white garland at TJ Maxx one day and decided to hang it on my dining room window, along with two other garlands. the jingle bell garland I made with a little twine + dollar store jingle bells. I purchased the greenery garland a few years ago at Michael's.


and here's a few shots of our hazardous front porch, that started caving in two weeks ago.


and there you have it! this is what Christmas at the tiny white house looks like.

merry, merry Christmas to you + yours.


but the angel said to them, "do not be afraid. I bring you good news of great joy that will be for all people. today in the town of David, a Savior has been born to you; he is Christ the Lord. this will be a sign to you: you will find a baby wrapped in cloths and lying in a manger."
Luke 2:10-12


"now thanks be to God for this indescribable gift, which is precious beyond words!"
2 Corinthians 9:15

Wednesday, November 25, 2015

a {mini} fall tour.

it's been a little while since I've shared a post, but since fall is coming to an end and winter [if it can even be called that in the south] is just around the corner, I thought I'd take you on a little fall tour of the tiny white house.


it's nothing too crazy or over the top, but I like to add a little touch of fall warmth to each room. and sometimes that just means throwing a pumpkin on a surface and calling it a day. 


first up: my fall tablescape.


I bought several fake pumpkins for 98¢ at Walmart and painted them shades of blue, cream, and khaki. I used them as my centerpiece and as a little happy for each place setting.

I also gathered chunky acorns to use on the mini cakestand centerpiece. I baked them on 350 degrees for about ten minutes, because I thought that might kill any bugs and funk growing in them. I'm not sure if it did, but I never saw any bugs or acorns rolling around on the table.


one of the not-so-good things about our little house is that we don't have a fireplace. I so hope in our next home we do. so since we have no mantle to decorate for holidays and no reason, I use the top of our piano as a mock mantle. here's what that ended up looking like:


one simple decor idea I came up with was to frame a packet of pumpkin seeds. I emptied out the packet, found a favorite chunky frame of mine, and used double sided tape to secure the seed packet in place. I think it turned out kind of cute. what do you think?


for the coffee table, I used a wooden dough bowl I found at a thrift store and filled it with cotton and a giant acorn I found at TJ Maxx. pretty simple, but adds a little taste of fall.


I also threw a couple pumpkins around the house, on shelves and counters. it adds a little bit of fall and takes almost no effort. 


like I said, nothing much, but it's funny how even little things add a little something extra. like so many other [white] girls, I love the fall. and not just because of pumpkin spice lattes--which I've never had, by the way. it's one of my favorite seasons... mainly because I am a heavy sweater so I sweat less in these months. but I also love the beauty of the changing leaves and scenery, how things seem to slow down, and all the time spent with family. football games are another plus, but that has less to do with the actual game [no offense, athletes] and more to do with the fine cuisine at the concession stand.


I hope you're enjoying these last days of fall and I hope your thanksgiving is filled with lots of family and laughter, delicious food and a grateful heart. after all, we all have so much to be thankful for.


"it is not joy that makes us grateful; it is gratitude that makes us joyful."
David Steindl-Rast


"give thanks to the Lord, for he is good; his love endures forever!"
1 Chronicles 16:34


Tuesday, July 28, 2015

simple {diy} silhouettes.

I've always loved the look of silhouettes, so classic and timeless. a few years ago, the children I nanny and I made some of themselves as a Christmas gift to their parents. I loved how they turned out and I've wanted to make my own ever since. about two years later, I finally got around to it. for the first time in the history of the tiny white house blog, I documented step-by-step instructions of the process.


here's what you'll need:
-printed photos of your subject's profile 
-black acrylic paint [I prefer matte, but gloss can be used as well]
-paint brush
-scissors
-tape, paper, + frame(s) [if you plan on framing]


first, take some photos of the profile in which you plan on doing a silhouette. this step is fairly simple, but here are a few tips to attain the desired look. 
  • take the photos outside. [this is also my number one tip for taking any photo. this is why I'm always hauling furniture outside to photograph it.] I've found that the natural light will help create crisp, clean lines, which will make for an easy cut.
  • for girls, the hair needs to be fixed in a way that will, for lack of a better term, look good in a profile shot. if your hair is shorter [above your shoulders], wearing it down is an option. if it's longer, it works best to have it up. I did some with my hair half up, half down, and it worked, but not as well as having it up. so I played around with it and tried a few different things... high bun, low bun, pony.
  • if you want a larger silhouette, you should take the photo in portrait format. if you want smaller, try landscape. for the silhouettes I made of the children, I chose to do a larger version. I took a close up photo in portrait format and ordered an 8x10 print. this time, I did it in landscape format. I ordered a few prints of the same shot in two different sizes [4x6, 5x7] and just played around with it. eventually I'd like to do a larger version of our silhouettes.
as far as ordering prints goes, I order gloss prints [though I prefer matte otherwise] from CVS or Walgreens. keep in mind, the prints don't have to be anything fancy. you'll be painting over these.

now that that's taken care of, it's time to get to work! carefully cut around the subject's profile in the picture. this step can be a little tedious, as you have to be precise and cut just so, so that a nose isn't too sharp and the hair is just right.


next up: painting. two to three coats of black paint will do the trick. just remember to leave time to dry between each coat.


now it's time to frame them! or do whatever you want to with them. I had two gold oval frames that I'd found at Goodwill, that I thought would be just perfect for silhouettes. after thoroughly cleaning and completely shattering the glass in one of the frames, I used double sided tape to attach the silhouettes to paper and frame them.


what do you think? would you ever make these?